RIGOR Product Support
Issue Priority Definitions & Product Support Contact Methods
The RIGOR Digital Checklist System Service Level Agreement matrix is shown below.
Contact method is priority dependent – email should be used for Priority 2, 3, & 4 issues. 24/7 phone support is provided for Priority 1 issues only.
When contacting Check-6 Technical Support (via email or phone as appropriate), include the following in your support request:
- Name of person submitting request
- Email & phone number of person submitting request
- Organization
- Current location (include time zone)
- Check-6 Technical Product Name and account details
- Description of issue encountered, approximate number of users affected, and impact on use
Only initial response times are ensured, not resolution times.
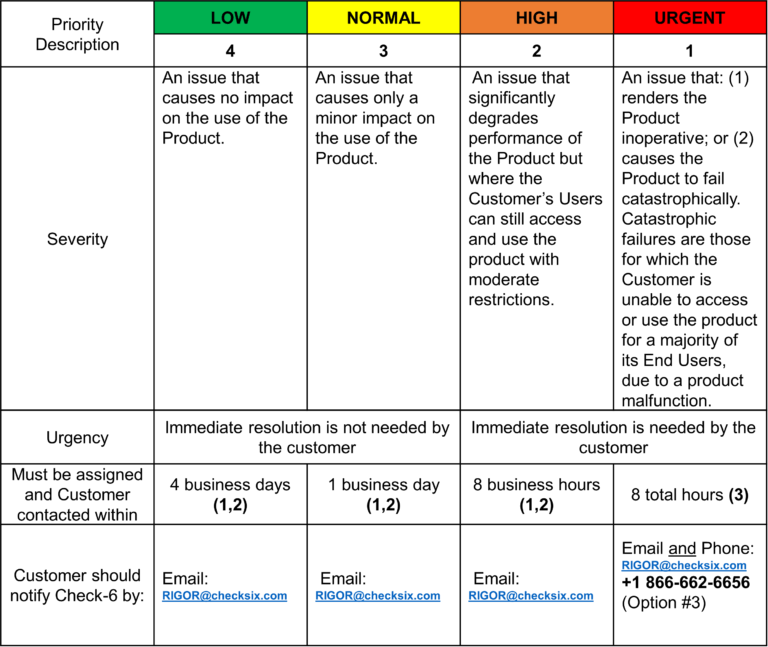
Normal business hours are 8:00 a.m-5:00 p.m. United States Central Time, Monday-Friday.
Check-6 Holidays:
Check-6 is closed for holidays including but not limited to:
-
- New Year’s Eve
- New Year’s Day
- Memorial Day
- Independence Day
- Labor Day
- Veteran’s Day
- Thanksgiving
- Day after Thanksgiving
- Christmas Eve
- Christmas Day
![]() RIGOR App Synchronization Issues
RIGOR App Synchronization Issues
Sync Will Not Start
This issue is typically due to network connection issues (or possibly a local firewall restriction).
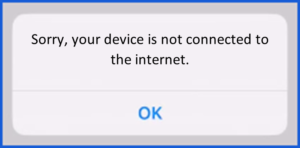
If receiving this error when initiating a sync (i.e. synchronization event), verify that device has Wi-Fi turned on and is connected to the network.
Using an internet browser (i.e. Safari), verify that you can connect to and log into RIGOR Web at https://checklistrigor.com/ (i.e. on an iPad/iPhone, open Safari and type in the web address).
If the problem persists, contact Product Support at [email protected].
Sync Failure
This issue is typically due to network connection issues.
Note: A network connection must be maintained throughout the synchronization process. Breaking the Wi-Fi connection during synchronization will cause a Sync Fail.
Note: Mobile devices must be set to use the Gregorian calendar (Settings>General>Language & Region>Calendar>Gregorian) and automatic date & time (Settings>General>Date & Time>Set Automatically) for the device to synchronize correctly with the RIGOR Server.
Failure to implement these settings could cause erroneous checklist and step completion time calculations and Sync Fail. Users who do not select Gregorian for their calendar will be unable to use the RIGOR App until the setting is corrected.
-
- Using an internet browser installed on the mobile device, verify that you can connect to and log into RIGOR Web at https://checklistrigor.com/ (i.e. on an iPad/iPhone, open Safari and type in the web address).
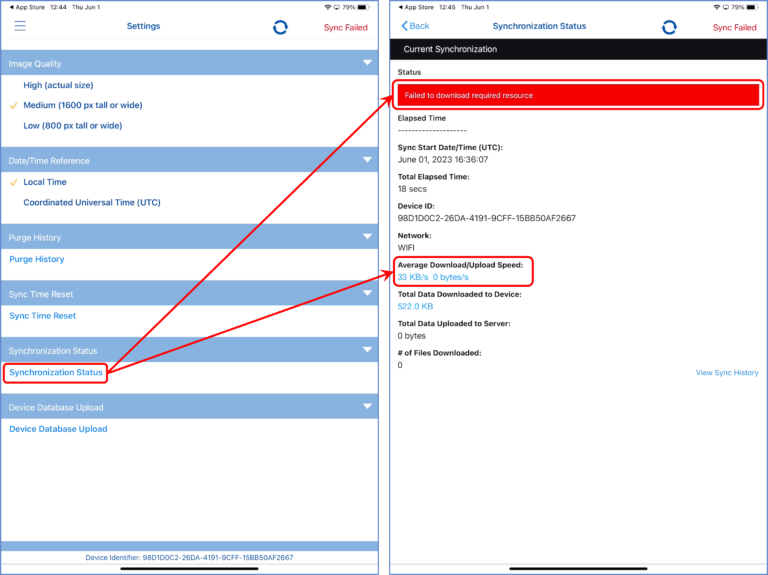
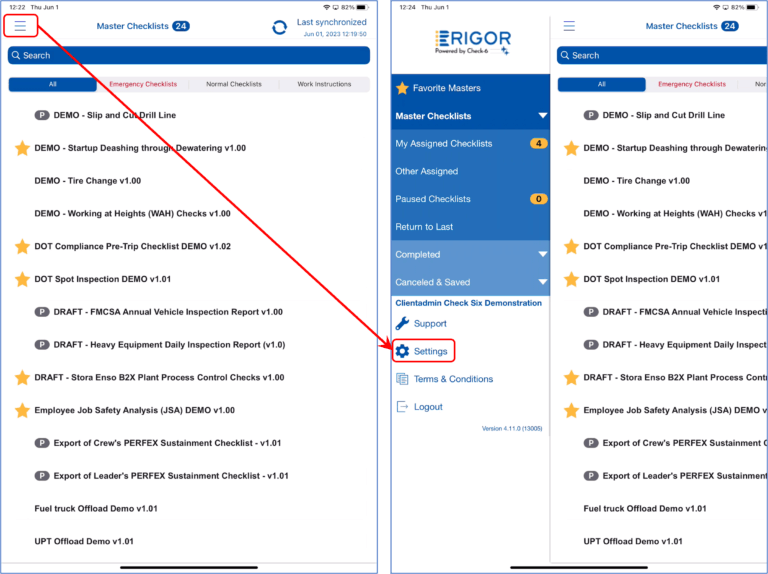
- On the RIGOR App, view the menu by selecting the three parallel lines at the top left and then select Settings.
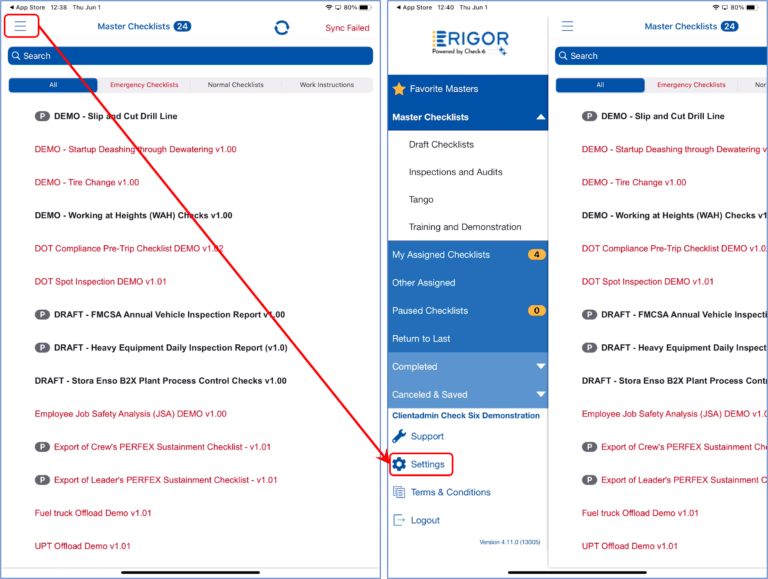
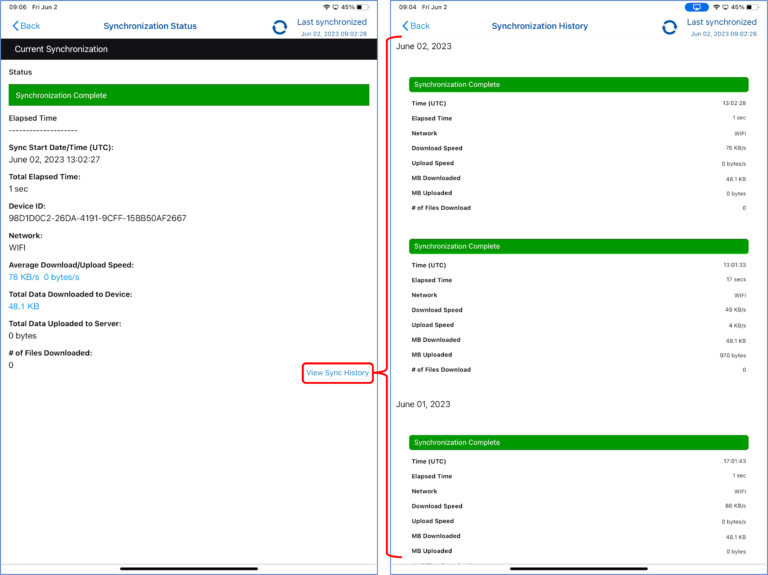
- Navigate to the Synchronization Status page within the RIGOR settings and verify that the minimum connection speed requirement is being met. Average download speed should be greater than 20KB/s (0.2Mbps) and note the reason for the current Sync Fail (reason for failure will be highlighted in the red bar below “Status”).
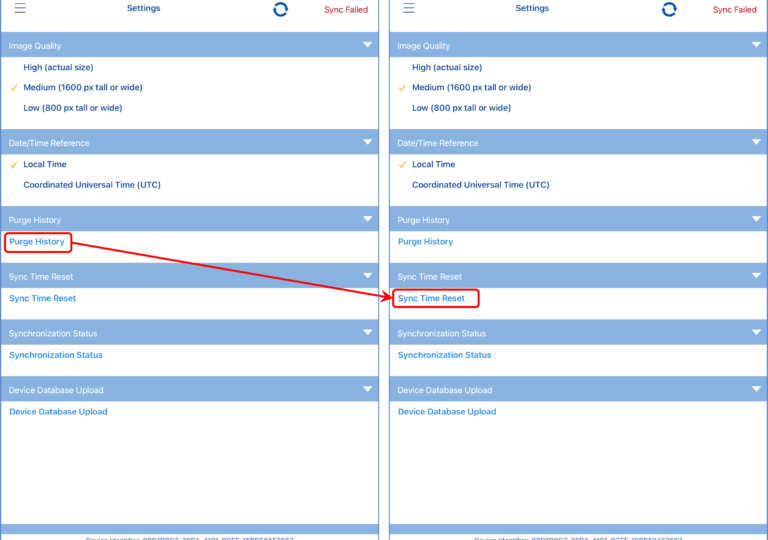
- Ensure the device is online, Purge History (removes previously synchronized Completed and Canceled & Saved checklists from the device database), then initiate a Sync Time Reset to attempt to get a successful sync.
If the problem persists, contact Product Support at [email protected].
Sync Taking Longer Than Expected
This issue is typically due to:
-
- Large amounts of data to be synchronized to/from the device
- Synchronizing checklists with more user resources (i.e. uploaded files, images, videos, etc.) will impact synchronization times
- Slow speed networks
- Degraded networks
- High-latency or intermittent signal may require several reattempts to sync data
- Large amounts of data to be synchronized to/from the device
Note: Frequent, small-volume synchronization events will improve the user experience when operating over slower or degraded networks.
-
- Navigate to the Synchronization Status page and verify download speed is greater than 20KB/s (0.2Mbps).
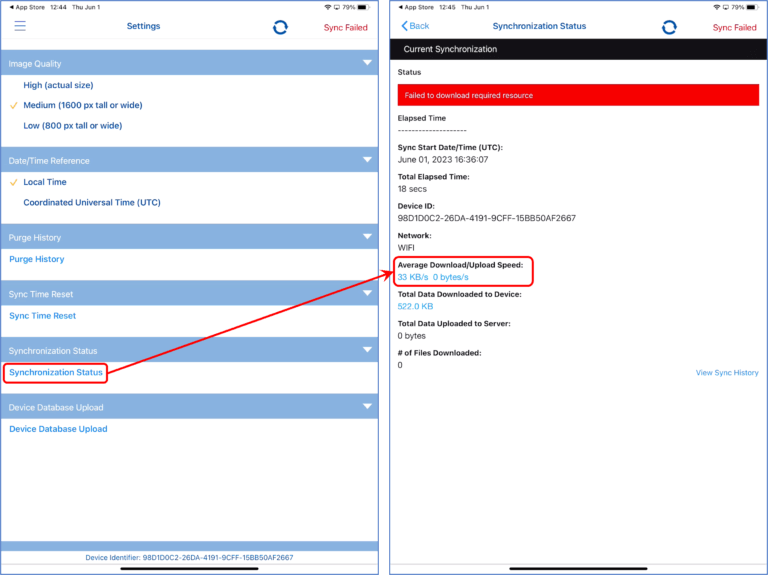
- Verify how often synchronization is being performed using the Synchronization History page.
- Have a user who has Admin or Manager permissions log into the account and verify that there are no excessive “orphaned” assigned or paused checklists that can directly impact sync times.
Note: “Orphaned” instances are old checklists that were assigned/started but abandoned prior to completion (i.e. Marked Complete, Canceled & Saved, or Cancel & Delete). Unwanted orphaned checklists should be periodically removed by Admin users using the RIGOR Web, so they are no longer included in sync events.If the problem persists, contact Product Support at [email protected].
- Navigate to the Synchronization Status page and verify download speed is greater than 20KB/s (0.2Mbps).
RIGOR Login and Password Issues
Cannot Login
- Open the RIGOR App, view the menu by selecting the three parallel lines at the top left and verify the latest version of the software is installed (version/build number appears at the bottom left of the menu screen).
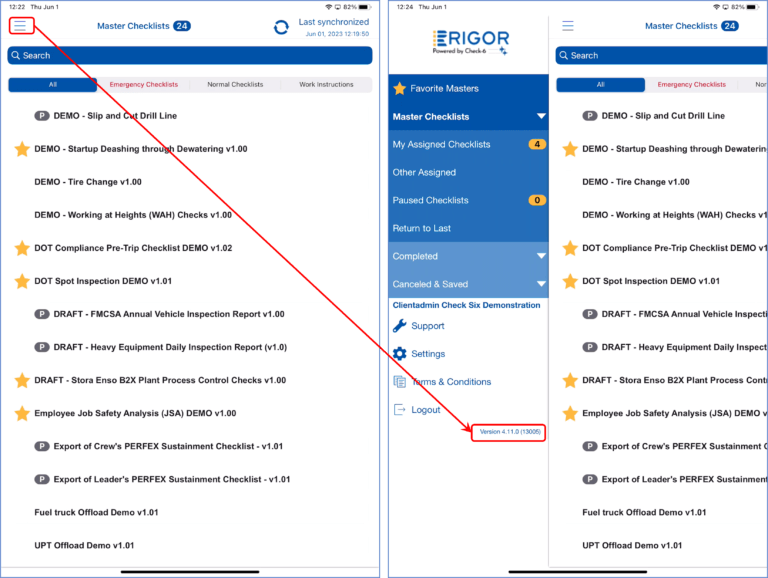
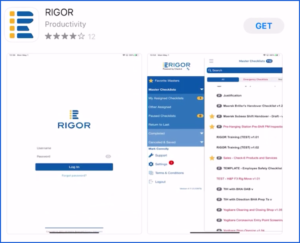
If required, download the latest version of the RIGOR App from the Apple App Store (search for “RIGOR”).
- Use an internet browser (e.g. Chrome, Firefox, MS Edge, etc.) to access the RIGOR Web (not RIGOR App) by navigating to https://checklistrigor.com/ and login to ensure the username and password is valid.
- If able to log into the RIGOR Web, ensure the mobile device is online and attempt to log into the RIGOR App with the same credentials.
Note: User credentials and status (locked/unlocked, password expired, etc.) are updated when logging in with the mobile device online and at every sync event. If a user was locked out, password expired, etc., the next login must be online after the account has been unlocked for the login to be successful.
If able to log into RIGOR Web but unable to log into the RIGOR App, contact Product Support at [email protected].
Password Change Required
- You will receive a message on the RIGOR Web or iOS device (RIGOR App) prompting you to change your password when a change is required. Note: Password policies are account specific and can be enabled or disabled and configured as desired by each client (e.g. password expiration can be set to never expire or expire every 90, 180, 360, etc. days).
- (RIGOR App) Ensure the device is online and follow the prompts to change your password. (RIGOR Web) Follow the prompts to change your password.
If your account is locked, contact a user who has Admin permissions to unlock your account and issue a new temporary password.
Note: When an Admin changes your password (e.g. account unlock, password reset, etc.), you will receive a temporary password via email and be required to change your password upon the next login to the RIGOR Digital Checklist System. No other user, even an Administrator, can look up your password, they can only reset your password to a one-time use temporary password.
You can change your password at any time by logging into the RIGOR Web, selecting the User Settings menu at top right of page (your first name appears as the menu title), and then Edit Profile.

If the problem persists, contact Product Support at RIGOR@checksix.com.
Resetting Another User's Password (Administrators Only)
- Use a computer and internet browser (e.g. Chrome, Firefox, MS Edge, etc.) to access the RIGOR Web (not RIGOR App) by navigating to https://checklistrigor.com/ and login with an Admin account.
- Select the Users button and search for desired user account.

- Select the Edit button on the desired user account.

- Verify email is correct and select Change Password
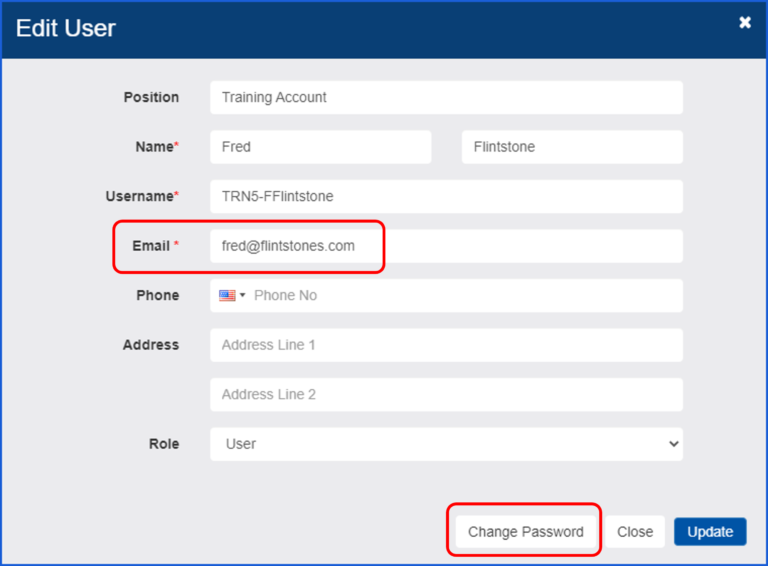
- Type a temporary new password and select Update on the Change Password pop-up.
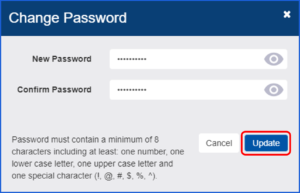
Note: The user will receive an email from RIGOR with their temporary credentials and they will be forced to change their password upon their next online login.
If the problem persists, contact Product Support at [email protected].
User Can't Login / Restore Deleted User / Unlock a User (Administrators Only)
- Use a computer and internet browser (e.g. Chrome, Firefox, MS Edge, etc.) to access the RIGOR Web (not RIGOR App) by navigating to https://checklistrigor.com/ and login with an Admin account.
- Select the Users button and search for desired user account and verify that the account is active (i.e., listed in the Users inventory).

If an active account is found, select the user and follow the steps needed to change the account’s password (See Resetting Another User’s Password). If you do not see the desired user account in the Users inventory, select the Deleted Users button to view to soft deleted (i.e. archived and locked) user accounts. All locked users will appear in this inventory.

- Locate the desired user account and select Restore

- Select Yes to navigate back to the Users page
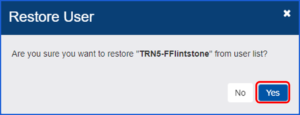
- Search for the restored user and select the Unlock button

- Type a temporary new password and select Update
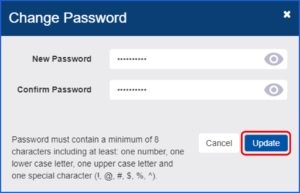
Note: The user will receive an email from RIGOR with their temporary credentials and they will be forced to change their password upon their next online login.
If the problem persists, contact Product Support at [email protected].
RIGOR Checklist Issues
Checklist Instance Has Gone Missing
Typically, this issue occurs when:
- Another user Completed or Canceled & Saved the instance
- It will be moved to the associated static instance inventory (i.e. Completed or Canceled & Saved)
- Note: After sync to the RIGOR Server, static checklist can be manually purged from mobile devices and will automatically be deleted from the mobile device after 72-hours
- The instance is Paused
- Paused is a higher priority state / after the checklist is resumed, it will move back to the My Assigned Checklists category (if it was assigned to or by you)
- Another user accidentally deleted the checklist instance
- Use of Cancel > Cancel & Delete permanently deletes the instance – it cannot be restored at this time
- If required, an Admin user may determine when and which user deleted the checklist (see below) if necessary, contact [email protected] for additional help.
- Use a computer and internet browser (e.g. Chrome, Firefox, MS Edge, etc.) to access the RIGOR Web (not RIGOR App) by navigating to https://checklistrigor.com/.
- Search each of the possible inventories to attempt to locate the checklist instance:
- Dashboard – My Assigned Checklists, Paused Checklists
- History Page (use search filters) – Completed Checklists, Canceled & Saved Checklists
- Admin users can search Deleted Checklists from the History page (Enter and apply filters to aid searching for deleted checklist)
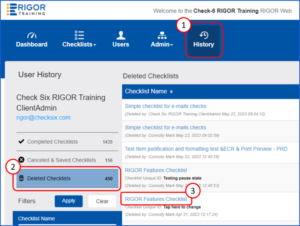
Once desired checklist is found, click on its title for additional details.
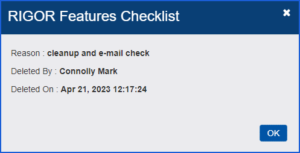
If the problem persists, contact Product Support at [email protected]
Checklist is in Preview Mode
The Preview Mode icon![]() is displayed for Master Checklists and Active Instances that are set to Preview Mode.
is displayed for Master Checklists and Active Instances that are set to Preview Mode.

-
- Preview Mode checklists are designed for content and functionality review – not for testing or operational use
- These checklists cannot be Marked Complete or Canceled & Saved to prevent checklist review, demonstration, and training instance data from mixing with operation checklist compliance and performance data and causing false outliers in RIGOR Analytics
- The only valid option for a Preview Mode Checklist is to use the Cancel & Delete option to terminate the instance after content and functionality review is complete
Contact an assigned Check-6 Coach or Client Manager to move the checklist from Preview Mode to an executable state.
If unable to contact an assigned Check-6 Coach or Client Manager, contact Product Support at [email protected].
Checklist Instance Shows on Web but Not on App
- On the RIGOR App, view the menu by selecting the three parallel lines at the top left and then select Settings.
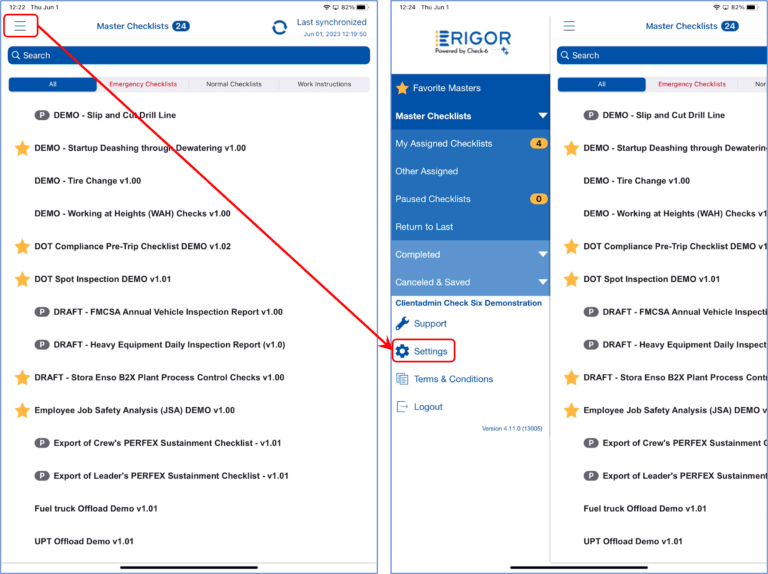
- Ensure the device is online and select Purge History (removes previously synchronized Completed and Canceled & Saved checklists from the device database), then initiate a Sync Time Reset to attempt to get a successful sync.
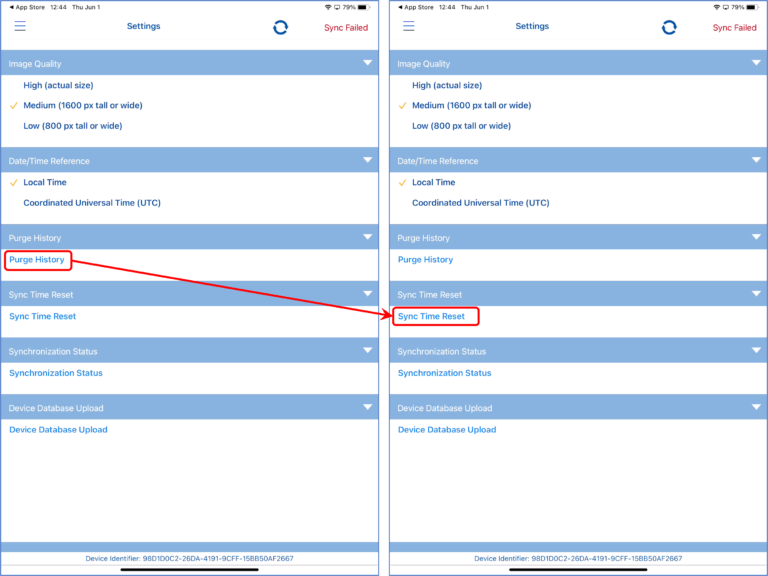
- If the checklist still does not appear after a successful purge and sync time reset, attempt another normal sync by selecting the sync icon, (located in the upper right corner of the display with the menu hidden).
If the problem persists, contact Product Support at [email protected]
User is Unable to Mark Steps Complete
To mark a step complete:
- (RIGOR App) Swipe left-to-right across the step with a finger or stylus
- (RIGOR Web) Use the mouse to click, hold, drag, then release the step completion toggle
Note: Users can complete any step on a checklist which has been assigned to them.
However, if a user was only assigned a checklist step or steps (vice the entire checklist), they can only complete the step(s) that were specifically assigned to them. Steps that were not assigned to them cannot be completed.
- On the RIGOR Web, when a step is assigned to a user, the user’s name appears on the step(s) and all non-assigned steps are grayed out.

- On the RIGOR App, when a step is assigned to a user, the Step Assignment arrow is still active. If the step is not assigned to the logged in user, the Step text and Step Assignment arrow will be grayed out.
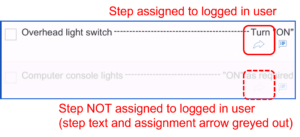
If the problem persists, contact Product Support at [email protected].
Checklist Requires Content Change(s)
Product Support cannot make any direct client checklist changes.
- Contact an assigned Check-6 Coach or Client Manager to update the checklist with changes or new content.
If unable to contact an assigned Check-6 Coach or Client Manager, contact Product Support at [email protected].
Restore a Deleted Checklist
Once the checklist instance has been deleted, it cannot currently be restored (future versions of RIGOR will allow deleted checklists instances to be restored to their previous state for up to 90 days after deletion).
-
- Use of Cancel > Cancel & Delete permanently deletes the instance
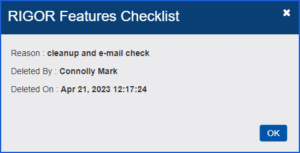
- If required, contact [email protected]to determine which user deleted the checklist and when it was deleted from the system
Admin users can search Deleted Checklists from the History page (Enter and apply filters to aid searching for deleted checklist)
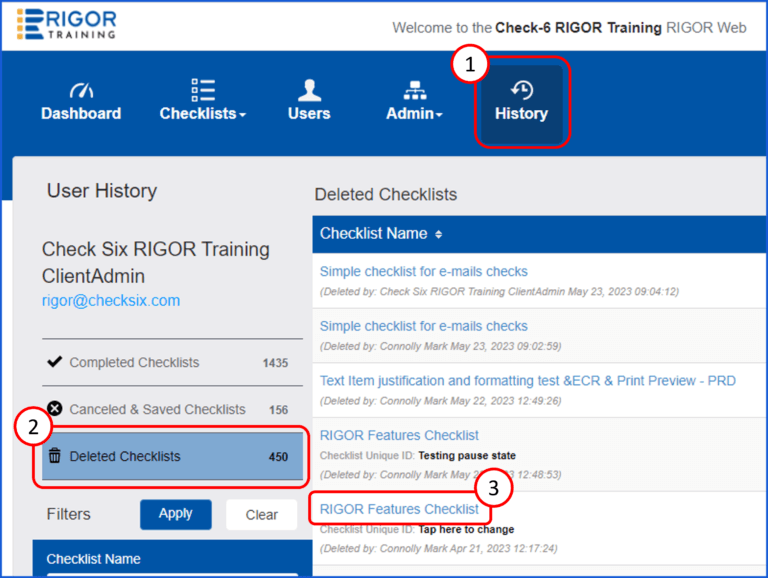
Once desired checklist is found, click on its title for additional details.
RIGOR App Installation Issues
Locate and Install the RIGOR App
- Sync existing versions of the RIGOR APP, if installed
- If a previous version of the App is installed, login and sync all local information on each device to the RIGOR Server, as required
- All active and static checklist instances should have black (NOT grey or red) title text to indicate that they are successfully synchronized from the local device to the RIGOR Server
- After a complete and successful sync, logout of and close the RIGOR App
- If a previous version of the App is installed, login and sync all local information on each device to the RIGOR Server, as required
- UPDATE (or DOWNLOAD or GET and install) the latest RIGOR App
- Go to the Apple App Store and search for “Rigor” to locate the latest version of the RIGOR APP
- Select UPDATE if a previous version of the RIGOR App is installed on the device
- Select the Download symbol if the new version of the RIGOR App is installed on another device registered to the same Apple ID
- Select GET if the RIGOR App has not been installed (or was uninstalled) and is not installed on another device registered to the same Apple ID
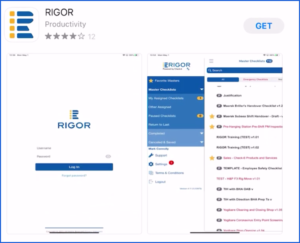
- Go to the Apple App Store and search for “Rigor” to locate the latest version of the RIGOR APP
CAUTION: Mobile devices must be set to use the Gregorian calendar (Settings>General>Language & Region>Calendar>Gregorian) and automatic date & time (Settings>General>Date & Time>Set Automatically) for the device to synchronize correctly with the RIGOR Server.
Failure to implement these settings could cause erroneous checklist and step completion time calculations and sync failure. Users who do not select Gregorian for their calendar will be unable to use the RIGOR App until the setting is corrected.
3. Open the App, login, and perform an initial sync event
-
- Master Checklists will turn red (Master Checklists missing embedded resources and/or logo), then grey (Master Checklists missing reference resources, i.e. the files accessed using the “paperclip”), then black (complete Master Checklist) during a normal initial sync
NOTE: Initial account synchronization requires valid account credentials and must be performed online.
Uninstall the RIGOR App
On an older iOS device, touch and hold the RIGOR App icon until the icon starts to shake and has an X appear next to it.
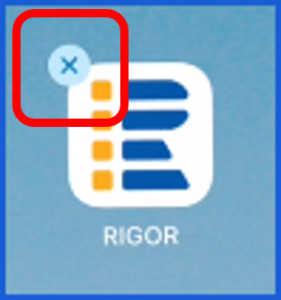
Select the “X”
Select “Delete”
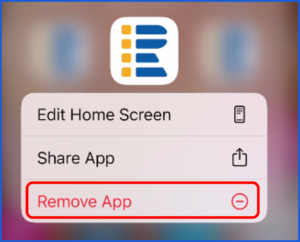
On newer devices, touch and hold the icon, select “Remove App” and then confirm by selecting “Delete App”
